1. Introduction
2. Docker commands
3. Docker - Data Management
4. Docker Networking
5. Docker Container Linking
6. Docker - Ports Management
7. Docker Compose
8. Docker - Logging
9. Docker - Public and Private repositories
10. Notes
1. Introduction
1.1 Virtualization

- Bare-metail Hypervisor: the Hypervisor deals with hardware drivers or resource management.
1.2 Docker
Docker is a platform for developers and sysadmins to develop, deploy, and run applications with containers.
- Docker Engine is a client-server application with major components:
+ A server which is a type of long-running program or service called a daemon process (the dockerd command). On Ubuntu, using:
sudo service docker stop/start to control the service
+ A command line interface (CLI) client (the docker command).
- Docker Hub: where you can download docker images that have been created by communities. You can upload your docker images to Docker Hub. This is the address of Docker Hub.
- Docker Image: is an executable package that includes everything needed to run an application–the code, a runtime, libraries, environment variables, and configuration files.
- Docker Containers: are instances of Docker images that are created using the Docker run command.
- Docker Tag: An image name is made up of slash-separated name components, optionally prefixed by a registry host name. If a host name is present, the command uses host_name:8080. If not present, the command uses Docker’s public registry with host name (this is Docker Hub) registry-1.docker.io by default. E.g: tag a local image with name "httpd" and tag "test" into the "fedora" repository with "version1.0.test" using command below:
sudo docker tag httpd:test fedora/httpd:version1.0.test
Containers and virtual machines:
- A container runs natively on Linux and shares the kernel of the host OS with other containers. Docker containers have separate user lists, file systems or network devices (virtual environments).
- A virtual machine (VM) runs a full operating system with virtual access to host resources through a hypervisor. In general, VMs provide an environment with more resources than most applications need.


- Multiple containers can share access to the same underlying image and their own data state.

- Commands to show more information of built images:
sudo docker image ls
sudo docker history
- Each container exists inside of its own address space within the Docker host’s local storage area (/var/lib/docker/<storage-driver>/)
2. Docker commands
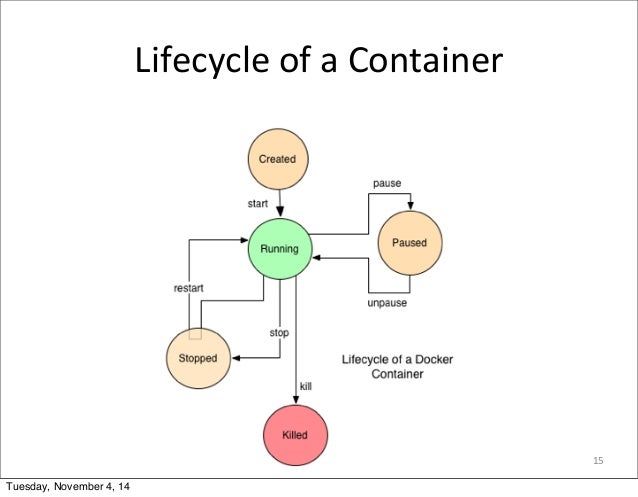
Here is the container life-cycle so we have command accordingly.

sudo docker inspect ImageID/ContainerID : show the details of an image or container.
2.1 Container commands
sudo docker ps -a : list all containers
sudo docker ps : list all running containers
sudo docker top ContainerID : show the top-level processes within a container.
sudo docker stop ContainerID : stop container ID
sudo docker rm ContainerID : delete a container ID
sudo docker stats ContainerID : display status of container ID
sudo docker attach ContainerID : This allows you to view running container error, output or to control it interactively, as though the commands were running directly in your terminal.
sudo docker restart docker-nginx : restart a container ID after updating configurations.
sudo docker kill ContainerID : kill a processes of container ID
sudo docker logs ContainerID : show container log
sudo docker build . -t myimage:latest
-t : create tag latest for the image
+ Check built image using the commands:
sudo docker images to check newly created image
+ Run our continer in interactive tty and background mode with name counter using commands:
sudo docker run -dit --name counter myimage
+ Attach our terminal to container using commands:
sudo docker attach counter
Finnaly, you will observe:


sudo docker inspect devtest
You will observe
sudo docker build . -t ubuntunw:latest
- Create our own network using command:
sudo docker network create –-driver bridge mynw
- Create 2 containers in 2 Terminals using command:
sudo docker run -it --network=mynw ubuntunw /bin/bash
- You can check the network information after creating 2 containers:
sudo docker network inspect mynw
- From command line of 2 containers using "ifconfig" to know the IP address of containers and then using "ping IP_address" to ping each other.
5. Docker Container Linking
Container Linking allows multiple containers to link with one another. This is another approach of containers communication.
Note: warning from Docker: the --link flag is a legacy feature of Docker. We recommend that you use user-defined networks to facilitate communication between two containers instead of using --link.
Let 's make a demo:
- 2 containers: 1 mysql client container and 1 mysql server container
- Using Container linking to create connection between mysql client and server
- From client typing "SHOW DATABASES;" to list all databases of server.
Steps to do:
- Install mysql docker using command:
sudo docker pull mysql
- Create a new image that supports mysql-client and busybox (supports UNIX tools such as ifconfig, sh, bash, ...). The content of Dockerfile:
sudo docker build . -t mysqlcli:latest
- Run mysql server container using command:
sudo docker run --name mysql -e MYSQL_ROOT_PASSWORD=example -d mysql
- Run mysql client container with --link option using command:
sudo docker run -it --link mysql:mysql --name client mysqlcli busybox sh
(you can use "ping mysql" to check whether client connected with server - it is similar to Docker Networking)
- From mysql client typing command to connect to the server:
mysql -u root -pexample -h mysql
- A shell occurs typing "SHOW DATABASES;" to observe list of all databases of server.
6. Docker - Ports Management
In container, when an application is running or listening on a port (such as nginx or apache2 are web server that work on default port 80), this port is not published to the outside world so the application is invisible to the outside world. So we have to map this port to a port on Docker host using "-p". E.g: "-p 8088:80" maps the container port 80 to Docker host port 8088. We had a demo for it in part 3-Docker Storage that using nginx.
7. Docker Compose
In some previous demos that used more than 2 containers, we often run containers sequentially. So we have to type many commands. With Docker compose we can define and run multi-container Docker applications using a single command following the steps:
- Download "docker-compose" tool (here we use version 1.19.0) from github using command:
curl -L https://github.com/docker/compose/releases/download/1.19.0/docker-compose-`uname -s`-`uname -m` -o /usr/local/bin/docker-compose
- Give execute privileges to tool.
chmod +x /usr/local/bin/docker-compose
- Create a YAML file to configure your applications
- Run "udo docker-compose up" to start and run all applications
Let 's make a demo. This demo is a combination of nginx, php, mysql. A simple website that queries the data from mysql server. We make it simple by just querying the tables that are available at the mysql server.
This demo is quite complicated. So follow the steps:
- Create php fpm and pdo driver image using Dockerfile:
- Build image using command:
sudo docker build -t phppdo:latest .
- Create docker-compose.yml file with content:
Notes:
Networking was used to connect the containers.
Volume was used to mount the php code and configuration files
Ports was using to map container ports to Docker host ports
- Run docker-compose using command:
sudo docker-compose up
- Open web browser and go to http://localhost:8088 to see list of mysql server's databases was showed
- I push full demo to github including code folder, mysql folder and site.conf file.
In index.php you have to change the IP of mysql server according to your case. This IP can be interchanged with container ID. Both solutions are ok. In case you use IP you can use the commands to find the IP of server:
sudo docker network ls
Looking for the network that was created by your project and using the command:
sudo docker inspect NameOfNetwork
And look for the IP of mysql server
Or you can use ContainerID as
8. Docker - Logging
Logging is necessary when we faced a problem, we need to know what happened so that we can fix it.
8.1 Daemon Logging
There are some logging levels for daemon:
- debug: prints all things
- info: prints all error and information (default)
- error: just prints all errors
- fatal: just print all fatal errors
- warn: just print all warnings
Using the below commands to setup debug (it can be info, error, fatal, warn) log level:
sudo service docker stop (need to stop daemon first)
sudo dockerd -l debug &
8.2 Container Logging
In order to observe the log of container just using command:
sudo docker logs ContainerID
9. Docker - Public and Private repositories
Public repositories: where you can download docker images that have been created by communities. You can upload your docker images to it. A famous public repository is Docker Hub. In order to upload your image to Docker Hub following the steps below:
- Create your account on Docker Hub
- After building your image (let 's take image in 5. for example), create a tag for it:
sudo docker tag mysqlcli:latest dockerHubAccount/mysqlcli:v0.0.1
- Push it to Docker Hub
sudo docker push dockerHubAccount/mysqlcli:v0.0.1
Private repositories: this is your own private repositories. There is a repository container itself from Docker. In order to use it you need Docker Registry. Steps to install and use it:
- Install Docker Registry and run it on hostname:port - localhost:5000
sudo docker run -d -p 5000:5000 --name registry registry:2
- Tag a local image to the Registry (use the created image in 5. for example)
sudo docker image tag mysqlcli localhost:5000/myimage:v0.0.1
- Push it to Registry
sudo docker push localhost:5000/myimage:v0.0.1
- Test it by pulling it again
sudo docker pull localhost:5000/myimage:v0.0.1
- If you want to delete your Registry:
sudo docker container stop registry && docker container rm -v registry
10. Notes
These are the collections of interesting points about Docker:
- Docker for Mac and Docker for Windows use a Linux VM
- An explicitly empty image, especially for building images "FROM scratch" is used to build base images (such as debian and busybox) or super minimal images
- Docker originally used LinuX Containers (LXC), but later switched to runC (formerly known as libcontainer), which runs in the same operating system as its host.
2. Docker commands
3. Docker - Data Management
4. Docker Networking
5. Docker Container Linking
6. Docker - Ports Management
7. Docker Compose
8. Docker - Logging
9. Docker - Public and Private repositories
10. Notes
1. Introduction
1.1 Virtualization

Figure: types of Hyperisors (source)
- Hosted Hypervisor: the Hypervisor runs as an application and Operating System's Kernel deals with hardware drivers or resource management.- Bare-metail Hypervisor: the Hypervisor deals with hardware drivers or resource management.
1.2 Docker
Docker is a platform for developers and sysadmins to develop, deploy, and run applications with containers.
- Docker Engine is a client-server application with major components:
sudo service docker stop/start to control the service
+ A command line interface (CLI) client (the docker command).
- Docker Hub: where you can download docker images that have been created by communities. You can upload your docker images to Docker Hub. This is the address of Docker Hub.
- Docker Image: is an executable package that includes everything needed to run an application–the code, a runtime, libraries, environment variables, and configuration files.
- Docker Containers: are instances of Docker images that are created using the Docker run command.
- Docker Tag: An image name is made up of slash-separated name components, optionally prefixed by a registry host name. If a host name is present, the command uses host_name:8080. If not present, the command uses Docker’s public registry with host name (this is Docker Hub) registry-1.docker.io by default. E.g: tag a local image with name "httpd" and tag "test" into the "fedora" repository with "version1.0.test" using command below:
sudo docker tag httpd:test fedora/httpd:version1.0.test
Containers and virtual machines:
- A container runs natively on Linux and shares the kernel of the host OS with other containers. Docker containers have separate user lists, file systems or network devices (virtual environments).
- A virtual machine (VM) runs a full operating system with virtual access to host resources through a hypervisor. In general, VMs provide an environment with more resources than most applications need.


Figure: Container vs Virtual Machine (source)
Examples of Docker hardware deployment:

Figure: Docker hardware deployment styles (source)
Here is a Docker architecture:
Figure: Docker architecture (source)
- When a container is created, a new thin writable layer (container layer) on top of the underlying layers (Image layers). All changes made to the running container, such as writing new files, modifying existing files, and deleting files, are written to this thin writable container layer. When a container is deleted, any data written to the container is deleted along with the container.
Docker Client requests Docker Daemon (in Docker Host) to run nginx server application via REST API -> Docker Daemon gets nginx server image from Docker Registry -> Create an instance (Docker Container) of nginx server image.
1.3 Inside Docker
This part was based on Docker document. I just copy essential points so that users can understand deeper. Image layers and container layer:
- It is important to understand how Docker builds and stores images, how these images are used by containers. A Docker image is built up from a series of layers. Each layer represents an instruction in the image’s Dockerfile. Each layer is read-only. Each layer only contains differences from the layer before it. The layers are stacked on top of each other.
- Let take a example with Dockerfile below:
FROM ubuntu:15.04
COPY . /app
RUN make /app
CMD python /app/app.py
This Dockerfile contains four commands. So after compiling, 4 layers will be created.

Figure: Container layer, Image layers (source)
- Multiple containers can share access to the same underlying image and their own data state.

Figure: Multiple containers share same image to save space
- Docker uses storage drivers to manage the contents of the image layers and the writable container layer. Each storage driver implements differently, but all drivers use stackable image layers and the copy-on-write (CoW) strategy.- Commands to show more information of built images:
sudo docker image ls
sudo docker history
- Each container exists inside of its own address space within the Docker host’s local storage area (/var/lib/docker/<storage-driver>/)
2. Docker commands
Here is the container life-cycle so we have command accordingly.

Figure: Container life-cycle (source)
Note: ContainerID is ID of container or the name of it. And ImageID is the name of Docker imagesudo docker inspect ImageID/ContainerID : show the details of an image or container.
2.1 Container commands
sudo docker ps -a : list all containers
sudo docker ps : list all running containers
sudo docker top ContainerID : show the top-level processes within a container.
sudo docker stop ContainerID : stop container ID
sudo docker rm ContainerID : delete a container ID
sudo docker stats ContainerID : display status of container ID
sudo docker attach ContainerID : This allows you to view running container error, output or to control it interactively, as though the commands were running directly in your terminal.
sudo docker restart docker-nginx : restart a container ID after updating configurations.
sudo docker kill ContainerID : kill a processes of container ID
sudo docker logs ContainerID : show container log
2.2 Image commands
sudo docker images : list all available Docker images.
sudo docker run ImageID : pull (if not exist) and run Docker image ID
sudo docker rmi ImageID : remove a Docker image ID
sudo docker images -q : List all Docker Image ID (short version of docker images)
3. Create a Docker Image
In order to create a Docker Image, we use Docker File. A Docker File is a simple text file with instructions (user-defined commands) on how to build your images. After finishing creating Docker File, we use the command below to build your image:
sudo docker build -t ImageName:TagName dir
Let 's make an example. The requirements of example:
- Red Hat image.
- Our application (C language and gcc compiler) just prints value of a counter that counts up every second.
- Attach our terminal to the Container to observe counter value.
Our application:
Using gcc to compile: gcc -o counter counter.c
Steps to do (I am using Ubuntu):
+ Download and Install Standard RHEL7 Base Images (minimal version) using command:
sudo docker pull registry.access.redhat.com/rhel7/rhel-atomic
+ Create a text file with name Dockerfile with content:
+ Build the image using command:sudo docker images : list all available Docker images.
sudo docker run ImageID : pull (if not exist) and run Docker image ID
sudo docker rmi ImageID : remove a Docker image ID
sudo docker images -q : List all Docker Image ID (short version of docker images)
3. Create a Docker Image
In order to create a Docker Image, we use Docker File. A Docker File is a simple text file with instructions (user-defined commands) on how to build your images. After finishing creating Docker File, we use the command below to build your image:
sudo docker build -t ImageName:TagName dir
Let 's make an example. The requirements of example:
- Red Hat image.
- Our application (C language and gcc compiler) just prints value of a counter that counts up every second.
- Attach our terminal to the Container to observe counter value.
Our application:
1 2 3 4 5 6 7 8 9 10 11 12 13 | #include <stdio.h> #include <unistd.h> void main() { int c = 0; while(1) { c++; printf("counter = %d\n", c); sleep(1); } } |
Steps to do (I am using Ubuntu):
+ Download and Install Standard RHEL7 Base Images (minimal version) using command:
sudo docker pull registry.access.redhat.com/rhel7/rhel-atomic
+ Create a text file with name Dockerfile with content:
1 2 3 4 5 6 7 8 9 10 11 | #Standard RHEL7 Base Images FROM registry.access.redhat.com/rhel7/rhel-atomic MAINTAINER <nha.tuan84@gmail.com> # create folder /home/tuan RUN mkdir -p /home/tuan #copy compiled executable file to /home/tuan COPY ./counter /home/tuan #set working dir is /home/tuan (similar to cd /home/tuan) WORKDIR /home/tuan #run the counter app ENTRYPOINT [ "./counter" ] |
sudo docker build . -t myimage:latest
-t : create tag latest for the image
+ Check built image using the commands:
sudo docker images to check newly created image
+ Run our continer in interactive tty and background mode with name counter using commands:
sudo docker run -dit --name counter myimage
+ Attach our terminal to container using commands:
sudo docker attach counter
Finnaly, you will observe:

Figure: Docker demo
Note: To stop and remove it using commands:
sudo docker stop counter
sudo docker rm counter
3. Docker - Data Management
Docker offers three different ways to mount data into a container from the Docker host: volumes, bind mounts, or tmpfs volumes.
- Volumes: are stored in a part of the host filesystem which is managed by Docker. A given volume can be mounted into multiple containers simultaneously. Volumes are the best way to persist data in Docker.
- Bind mounts: using
bind mount, a file or directory on the host machine is mounted into a
container. The file or directory is referenced by its full path on the host
machine.
- tmpfs mounts: are not persisted on disk, either
on the Docker host or within a container. It can be used by a container during
the lifetime of the container, to store non-persistent state or sensitive
information.

Figure: 3 different ways to mount data into a container
Let 's make some examples for these concept.
Bind mounts example: copy the html source code to a nginx (http server) container by mounting "/usr/share/nginx/html" of container to ${pwd}/html. Using commands:
Bind mounts example: copy the html source code to a nginx (http server) container by mounting "/usr/share/nginx/html" of container to ${pwd}/html. Using commands:
sudo docker pull nginx
sudo docker run -d -it --name devtest --mount type=bind, source="$(pwd)"/html,target=/usr/share/nginx/html nginx:latest
sudo docker inspect devtest
You will observe
"Mounts": [
{
"Type": "bind",
"Source": "/home/tuan/workspace/docker/html",
"Target": "/usr/share/nginx/html"
}
]
sudo docker run -d -it -p 8088:80 --name ngxtest --mount type=bind,source="$(pwd)"/html,target=/usr/share/nginx/html nginx:latest
Now create a file named "index.html" in folder "$(pwd)"/html" with content:
"<h1>nginx docker</h1>"
Open web browser and go to "http://localhost:8088"
Volume example:
- A volume will be created.
- Using docker to run create rhel7/rhel-atomic base container
- Attach a shell to container and then create a file with content "hello"
- A volume will be created.
- Using docker to run create rhel7/rhel-atomic base container
- Attach a shell to container and then create a file with content "hello"
- Stop and restart container.
- Re-read the content of file.
Using commands:
sudo docker volume create test-vol
sudo docker run -dit --name=redhat --mount source=test-vol,destination=/home registry.access.redhat.com/rhel7/rhel-atomic
sudo docker attach redhat
echo "hello" > /home/test.txt
exit
sudo docker rm redhat
sudo docker run -dit --name=redhat --mount source=test-vol,destination=/home registry.access.redhat.com/rhel7/rhel-atomic sudo docker attach redhat
cat /home/test.txt If you want to remove created volume using:
sudo docker rm redhat
sudo docker volume rm test-vol
sudo docker volume ls
4. Docker Networking
Containers can communicate with other containers and also with the Docker Host via Networking.
Commands:
sudo docker network ls : list all Docker networking
sudo docker network inspect NetworkName : show detail of Network Name
sudo docker network create --driver DriverName NetworkName : create your own NetworkName with DriverName (bridge, host)
Let 's make a demo: create 2 container in the same network that can ping each other.
In order to make demo for networking, we have to create a new ubuntu image because the original one did not install network tools such ass: ping and ifconfig.
- Create Docker file with content:
- Build Docker image using command:- Re-read the content of file.
Using commands:
sudo docker volume create test-vol
sudo docker run -dit --name=redhat --mount source=test-vol,destination=/home registry.access.redhat.com/rhel7/rhel-atomic
sudo docker attach redhat
echo "hello" > /home/test.txt
exit
sudo docker rm redhat
sudo docker run -dit --name=redhat --mount source=test-vol,destination=/home registry.access.redhat.com/rhel7/rhel-atomic sudo docker attach redhat
cat /home/test.txt If you want to remove created volume using:
sudo docker rm redhat
sudo docker volume rm test-vol
sudo docker volume ls
4. Docker Networking
Containers can communicate with other containers and also with the Docker Host via Networking.
Commands:
sudo docker network ls : list all Docker networking
sudo docker network inspect NetworkName : show detail of Network Name
sudo docker network create --driver DriverName NetworkName : create your own NetworkName with DriverName (bridge, host)
Let 's make a demo: create 2 container in the same network that can ping each other.
In order to make demo for networking, we have to create a new ubuntu image because the original one did not install network tools such ass: ping and ifconfig.
- Create Docker file with content:
1 2 3 4 5 6 7 8 | FROM ubuntu MAINTAINER nha.tuan84@gmail.com RUN apt-get update #install network tools RUN apt-get install -y net-tools RUN apt-get install -y iputils-ping CMD ["echo","Image created"] |
sudo docker build . -t ubuntunw:latest
- Create our own network using command:
sudo docker network create –-driver bridge mynw
- Create 2 containers in 2 Terminals using command:
sudo docker run -it --network=mynw ubuntunw /bin/bash
- You can check the network information after creating 2 containers:
sudo docker network inspect mynw
- From command line of 2 containers using "ifconfig" to know the IP address of containers and then using "ping IP_address" to ping each other.
5. Docker Container Linking
Container Linking allows multiple containers to link with one another. This is another approach of containers communication.
Note: warning from Docker: the --link flag is a legacy feature of Docker. We recommend that you use user-defined networks to facilitate communication between two containers instead of using --link.
Let 's make a demo:
- 2 containers: 1 mysql client container and 1 mysql server container
- Using Container linking to create connection between mysql client and server
- From client typing "SHOW DATABASES;" to list all databases of server.
Steps to do:
- Install mysql docker using command:
sudo docker pull mysql
- Create a new image that supports mysql-client and busybox (supports UNIX tools such as ifconfig, sh, bash, ...). The content of Dockerfile:
1 2 3 4 5 6 7 8 | FROM ubuntu MAINTAINER nha.tuan84@gmail.com RUN apt-get update #install network tools RUN apt-get install -y busybox RUN apt-get install -y mysql-client CMD ["echo","Image created"] |
- Run mysql server container using command:
sudo docker run --name mysql -e MYSQL_ROOT_PASSWORD=example -d mysql
- Run mysql client container with --link option using command:
sudo docker run -it --link mysql:mysql --name client mysqlcli busybox sh
(you can use "ping mysql" to check whether client connected with server - it is similar to Docker Networking)
- From mysql client typing command to connect to the server:
mysql -u root -pexample -h mysql
- A shell occurs typing "SHOW DATABASES;" to observe list of all databases of server.
6. Docker - Ports Management
In container, when an application is running or listening on a port (such as nginx or apache2 are web server that work on default port 80), this port is not published to the outside world so the application is invisible to the outside world. So we have to map this port to a port on Docker host using "-p". E.g: "-p 8088:80" maps the container port 80 to Docker host port 8088. We had a demo for it in part 3-Docker Storage that using nginx.
7. Docker Compose
In some previous demos that used more than 2 containers, we often run containers sequentially. So we have to type many commands. With Docker compose we can define and run multi-container Docker applications using a single command following the steps:
- Download "docker-compose" tool (here we use version 1.19.0) from github using command:
curl -L https://github.com/docker/compose/releases/download/1.19.0/docker-compose-`uname -s`-`uname -m` -o /usr/local/bin/docker-compose
- Give execute privileges to tool.
chmod +x /usr/local/bin/docker-compose
- Create a YAML file to configure your applications
- Run "udo docker-compose up" to start and run all applications
Let 's make a demo. This demo is a combination of nginx, php, mysql. A simple website that queries the data from mysql server. We make it simple by just querying the tables that are available at the mysql server.
This demo is quite complicated. So follow the steps:
- Create php fpm and pdo driver image using Dockerfile:
1 2 3 4 5 | FROM php:fpm MAINTAINER nha.tuan84@gmail.com RUN apt -y update RUN docker-php-ext-install pdo pdo_mysql |
sudo docker build -t phppdo:latest .
- Create docker-compose.yml file with content:
1 2 3 4 5 6 7 8 9 10 11 12 13 14 15 16 17 18 19 20 21 22 23 24 25 26 27 28 29 30 31 | version: '2' services: web: image: nginx:latest ports: - "8080:80" volumes: - ./code:/code - ./site.conf:/etc/nginx/conf.d/default.conf networks: - code-network php: image: phppdo volumes: - ./code:/code networks: - code-network database: image: mysql environment: - MYSQL_ROOT_PASSWORD=example ports: - "3306:3306" volumes: - ./mysql/my.cnf:/etc/mysql/my.cnf networks: - code-network networks: code-network: driver: bridge |
Networking was used to connect the containers.
Volume was used to mount the php code and configuration files
Ports was using to map container ports to Docker host ports
- Run docker-compose using command:
sudo docker-compose up
- Open web browser and go to http://localhost:8088 to see list of mysql server's databases was showed
- I push full demo to github including code folder, mysql folder and site.conf file.
In index.php you have to change the IP of mysql server according to your case. This IP can be interchanged with container ID. Both solutions are ok. In case you use IP you can use the commands to find the IP of server:
sudo docker network ls
Looking for the network that was created by your project and using the command:
sudo docker inspect NameOfNetwork
And look for the IP of mysql server
Or you can use ContainerID as
8. Docker - Logging
Logging is necessary when we faced a problem, we need to know what happened so that we can fix it.
8.1 Daemon Logging
There are some logging levels for daemon:
- debug: prints all things
- info: prints all error and information (default)
- error: just prints all errors
- fatal: just print all fatal errors
- warn: just print all warnings
Using the below commands to setup debug (it can be info, error, fatal, warn) log level:
sudo service docker stop (need to stop daemon first)
sudo dockerd -l debug &
8.2 Container Logging
In order to observe the log of container just using command:
sudo docker logs ContainerID
9. Docker - Public and Private repositories
Public repositories: where you can download docker images that have been created by communities. You can upload your docker images to it. A famous public repository is Docker Hub. In order to upload your image to Docker Hub following the steps below:
- Create your account on Docker Hub
- After building your image (let 's take image in 5. for example), create a tag for it:
sudo docker tag mysqlcli:latest dockerHubAccount/mysqlcli:v0.0.1
- Push it to Docker Hub
sudo docker push dockerHubAccount/mysqlcli:v0.0.1
Private repositories: this is your own private repositories. There is a repository container itself from Docker. In order to use it you need Docker Registry. Steps to install and use it:
- Install Docker Registry and run it on hostname:port - localhost:5000
sudo docker run -d -p 5000:5000 --name registry registry:2
- Tag a local image to the Registry (use the created image in 5. for example)
sudo docker image tag mysqlcli localhost:5000/myimage:v0.0.1
- Push it to Registry
sudo docker push localhost:5000/myimage:v0.0.1
- Test it by pulling it again
sudo docker pull localhost:5000/myimage:v0.0.1
- If you want to delete your Registry:
sudo docker container stop registry && docker container rm -v registry
10. Notes
These are the collections of interesting points about Docker:
- Docker for Mac and Docker for Windows use a Linux VM
- An explicitly empty image, especially for building images "FROM scratch" is used to build base images (such as debian and busybox) or super minimal images
- Docker originally used LinuX Containers (LXC), but later switched to runC (formerly known as libcontainer), which runs in the same operating system as its host.


0 Comments